Creamy Four Cheese Garlic Spaghetti Sauce


Homemade Creamy Four Cheese Garlic Spaghetti Sauce is the best white cheese Italian pasta sauce you’ll ever try!  Four-Cheese Blend includes Mozzarella, White Cheddar, Provolone, Asiago cheeses. 
If you ever wondered how to make spaghetti sauce other than with spaghetti and meatballs, then try this white cheese sauce for your next pasta dinner!

READ ON the recipe instructions below on how to make this easy pasta sauce:

Creamy Four Cheese Garlic Spaghetti Sauce

Total Time: 35 minutes
Yield: 4 servings
Ingredients

  •     1 tablespoon olive oil
  •     1 tablespoon butter
  •     5 garlic cloves, minced
  •     8 oz spaghetti
  •     1 cup cooked pasta water
  •     1 chicken bullion cube
  •     1 cup heavy cream
  •     1 and 1/2 cups of Four-Cheese Italian White Cheese Blend (Mozzarella, White Cheddar, Provolone, Asiago)
  •     parsley or chives or green onions, finely chopped

Read More : Creamy Four Cheese Garlic Spaghetti Sauce

Make Ahead Pepperoni Pizza Sliders


Make Ahead Pepperoni Pizza Sliders are a super easy and fun way to serve pizza. I’m not sure which I fell in love with first, the extra cheesy fillings, or the crispy Italian topping on the bread! Either way these are a winner with kids and adults!

I have grown to love sliders. In fact, Hot Ham and Cheese Sliders and Hot Breakfast Egg and Cheese Sliders and two of the most popular recipes on my blog. I totally understand why too.
Sliders can be made ahead, that’s a big deal to me, especially if I am serving them for a party.You can make enough to feed an army, or a fifteen year old and his friends which can feel like feeding an army, or you can make just one for you.
These sliders are so easy to make that I think my kids can do it themselves!
Since I use frozen rolls, and I freeze pepperoni and grated mozzarella cheese, I always have the ingredients on hand.

Cut rolls in half. Put the bottom halves of rolls in a greased baking sheet or pan. Start the inside goodness by layering pizza sauce, grated mozzarella cheese or slices, and pepperoni slices.
Set the tops of the rolls on the last cheese layer. Make a little Italian garlic butter concoction and brush it over the tops of the rolls. The tops of these sliders are like eating a cheesy bread stick! It’s icing on the cake, or something like that. Whatever it is, it’s GOOD!

I asked my boys to tell me all the foods they want to eat while watching the big game this weekend. Loaded tater skins, shrimp, pizza, and bean dip were on the list. I’m going to give them at least one of the foods they listed and it’s going to be pepperoni pizza, in slider form.

Make Ahead Pepperoni Pizza Sliders

Make Ahead Pepperoni Pizza Sliders are a super easy and fun way to serve pizza. I’m not sure which I fell in love with first, the extra cheesy fillings, or the crispy Italian topping on the bread! Either way these are a winner with kids and adults!
Recipe type: appetizer, Pizza, sandwiches
Cuisine: American, Italian
Serves: as many as you want

Ingredients
  •     Rolls (I actually use bake frozen rolls and use those most of the time.)
  •     Pizza sauce or marinara sauce
  •     Pepperoni slices
  •     Grated, or sliced mozzarella cheese
  •     Olives, peppers, onions, mushrooms, sausage, etc. (optional toppings)
  •     ¼ c. butter
  •     1 cloves garlic, minced
  •     1 tsp. Italian seasoning
  •     2 T. Parmesan cheese
  •     sea salt

Read More : Make Ahead Pepperoni Pizza Sliders

Caramel Magic Cake


This delicious recipe has been generously shared by one of our great cooks, Carina. She’s always coming up with great recipes, and here we have a recipe for Caramel Cake Flan. It’s a cross between a Leche / Flan / Egg Custard and a cake! Carina first saw the recipe being shown on Pati’s Mexican Food TV Show, and decided after scribbling down the recipe whilst watching the cook show, she would make it and see how it turned out, and here is the final product!
Carina says it is really AWESOME and yes, the possibilities are endless!
You could even line the bottom with apple or pear slices in the caramel so it comes out like an upside down cake!


Caramel Magic Cake

Prep Time: 10 minutes
Cook Time: 50 – 55 minutes
Yield: 8 moulds
*** I used ceramic moulds / ramekins ( mine are 4 inches diameter and 2 inches deep) and because I don’t have 8, I used 5 and added the remaining mix into one large baking dish.

Ingredients

For the Cake:
  • 1/4 cup butter
  • 3/4 cup granulated sugar
  • 1 egg
  • 3/4 cup all-purpose flour
  • 1/2 tsp baking powder
  • 1/2 tsp baking soda
  • Pinch of salt
  • 3/4 cup buttermilk
  • 1 tsp vanilla
For the Flan:
  • 1 12-oz can evaporated milk
  • 1 14-oz can sweetened condensed milk
  • 4 eggs
  • 1 tsp vanilla
For the base of the moulds:
  • 1 cup dulce de leche

Read More :  Caramel Magic Cake

Pumpkin Lasagna


Have you noticed that I’ve already been posting PUMPKIN recipes?!

Don’t go hating on me for it. I like to be ahead of schedule to make sure you guys have plenty of time to see all of the recipes before the actual holidays and seasons. ;D

Pumpkin Season is something I’ve been gearing up for for awhile now. Some of the most popular recipes on this site are pumpkin recipes, which tells me you guys LOVE pumpkin. With that in mind, I have to make sure I’m providing loads of delicious, mouth-watering pumpkin recipes to keep you guys coming back. I’m hoping I’ve done that for you, and I think it’s working because I’m officially a pumpkin dessert convert myself. I’ve always liked pumpkin recipes but would have called myself a chocolate kind of gal before. Recently, all I want is pumpkin! I think it all started when my mom got me a Pumpkin Muffin Top from Kneader’s right after we moved back to Arizona in June. I thought I’d give it a try, and I LOVED it. Now, I order the muffin tops all the time, and after becoming obsessed with them and working on pumpkin desserts for the last 6 weeks, I officially LOVE pumpkin. My favorite recipe so far has to be today’s recipe for Pumpkin Lasagna. It’s very similar to the White Chocolate Lasagna and Lemon Lasagna I’ve posted on the site – this is just a pumpkin version.

I’m happy to report that everyone who tried it loved it!! In fact, I took some over to my cousin’s family (because the hubby and I were eating the whole thing by ourselves) and her husband wasn’t too happy with me after he ended up eating several pieces a. LOL!

If you love pumpkin and love layered desserts, I definitely think you should give this one a try. It is sure to be a hit at your next get together and will knock off everyone’s socks. Here’s the recipe:

Pumpkin Lasagna

INGREDIENTS:
  •     2 rows of Golden Oreos
  •     2 rows of Pumpkin Oreos
  •     8 TB unsalted butter, melted
  •     1 8 oz. PHILADELPHIA Cream Cheese (softened)
  •     ½ cup butter
  •     1 cup powdered sugar
  •     1 large container cool whip (16 ounces), divided
  •     2 – 3.4 oz packages of pumpkin instant pudding
  •     3 cups milk
  •     white chocolate bar (to make curls with) – I use vanilla candy coating


Read More : Pumpkin Lasagna

Crispy Sesame Chicken


Crispy Sesame Chicken is easy to make with super crispy batter and delicious sesame sauce you’ll skip the takeout and done in just 30 minutes!

How do you make sesame chicken sauce?

There are a couple of ways to make sesame chicken sauce. This recipe includes soy sauce, brown sugar, garlic, sesame oil, rice vinegar and cornstarch where more in depth recipes include dark soy sauce and shaoxing rice wine.

How do you make sesame chicken? A quick and easy tempura battered chicken is tossed with an easy sauce made with rice wine and soy sauce sweet and spicy mixture.

Can I make this recipe into a Sesame Chicken Stir Fry?

Absolutely! Skip the batter and simply coat the chicken in cornstarch before adding to a skillet with a couple of tablespoons of oil. Continue with the garlic and red pepper before adding the sauce and letting it thicken. This version is also an easy way to make this into a healthy sesame chicken recipe by skipping the breading.

Tools used in the making of this Crispy Sesame Chicken:
Wok: The best way to cook quickly and over high heat for Asian dishes, this wok is the perfect stir fry pan.
Rice Vinegar: Readily available in almost all grocers these days, this is a great vinegar to keep on hand. It does have a hint of sweetness to it, so don’t replace with any other vinegar except perhaps a red wine vinegar if you absolutely need to.
Soy Sauce: Nothing much to say here except Kikkoman has the best flavor overall and I always recommend reduced sodium.
Sesame Oil: The flavor of sesame oil in this dish is unmistakeable and not really able to be substituted. Some Asian grocery stores will try and sell less expensive options that aren’t actually sesame oil, so just be sure the one you’re buying is authentic sesame oil.
Pig Tail Flipper: This tool is one of three that I couldn’t live without. My chef’s knife, my tongs and this. It is a tiny sharp point thats curled like a pig’s tail. It allows you to pick up and flip foods without disturbing breading or crushing it with tongs and FAST.

Crispy Sesame Chicken

Prep: 15 minutes
Cook: 15 minutes
Total Time: 30 minutes
Crispy Sesame Chicken is easy to make with super crispy batter and delicious sesame sauce you’ll skip the takeout!

Ingredients:

Sesame Chicken Sauce:
  •     1/4 cup soy sauce
  •     1/4 cup rice vinegar
  •     1/2 cup brown sugar
  •     1 tablespoon corn starch
  •     1/3 cup water
  •     2 teaspoons sesame oil
  •     1/2 tablespoon sesame seeds 
Tempura Batter:
  •     1/2 cup cornstarch
  •     1/2 cup flour
  •     2 egg whites
  •     1/2 cup cold seltzer water
  •     Oil, for deep-frying
Chicken:
  •     1 lb chicken thighs, boneless and skinless cut into 1″ chunks
  •     2 teaspoons sesame oil
  •     1/4 teaspoon crushed red pepper
  •     1 tablespoon minced garlic
  •     vegetable oil for deep frying


Read More : Crispy Sesame Chicken

Homemade Cinnamon Roll Coffee Creamer


Homemade Cinnamon Roll Coffee Creamer – a 5-minute coffee creamer that requires only 5 ingredients and tastes exactly like your favorite cinnamon rolls! Your mornings deserve to be a little sweeter!

Homemade coffee creamer (read that 5-minute coffee creamer) that tastes just like cinnamon roll. Can I get a high five?

Days are getting colder and I am craving my morning cup of coffee more than ever. It’s a part of our routine and let’s be real, as busy parents of three kids – we simply need it. Week days are not only shorter but busier and we definitely need the fuel. On the weekends we try to slow down. If you follow me on Instagram, you know that we have a little series going on called Sunday Mornings For 2. Every Sunday, we take time to enjoy our coffee and I always try to make pastry to go with it. Last weekend, we had cinnamon rolls. I will come clean and admit they were from a tube. Whomp whomp. It’s only because we are in the busiest time of the year right now and I am already baking and cooking a lot. I took a shortcut. But the coffee and cinnamon roll combo was so good, it gave me an idea. How about a homemade coffee creamer that tastes just like a cinnamon roll. I could add a splash to my cup on any week day and make my morning just a little bit sweeter.

Few weeks ago, I shared my recipe for Pumpkin Spice Coffee Creamer and so many of you made it and love it and took time to let me know via comments, emails and messages. THANK YOU! Inspired by the success of the pumpkin version, I wanted to share with you another one. For those days when we get a little tired of pumpkin everything and want something different. If you are obsessed with cinnamon rolls and crave them as often as I do – you will love this coffee creamer! As it’s pumpkin version, this one is also perfectly sweetened and spiced with cinnamon. It will take your plain cup of joe to a new level. Life is busy, especially now during the holiday season, and we all deserve a little treat. Better yet if it’s easy to make and perfect to start the day with!  If you decide to share your cup with someone, expect not getting it back! This coffee creamer is crazy delicious!

Enjoy, friends!

Homemade Cinnamon Rolls Coffee Creamer

Prep Time :5 mins
Cook Time :4 mins
Total Time :9 mins
Course: Drinks
Cuisine: American
Servings: 8 servings
Calories: 320 kcal

Ingredients
  •     1 cup milk
  •     1 cup heavy cream
  •     2 teaspoon and 1/2 ground cinnamon
  •     2 teaspoon pure vanilla extract use the good quality
  •     4 Tablespoons packed light brown sug


Read More : Homemade Cinnamon Roll Coffee Creamer

Sugar free chocolate chip cookies


Say hello to my Sugar free chocolate chip cookies or the best guilt-free low carb cookies.
We all love a sweet and crispy chocolate chip cookie right? So what about an easy Sugar free chocolate chip cookies recipe that don’t blow your sugar level! It sounds unbelievable but I did it.  You know how much I love sharing my sugar free dessert recipe on the blog. Trust me, those sugar free Chocolate Chip Cookies are the most delicious low carb cookies I made.

Sugar free Chocolate Chip Cookies with nuts

I read all your emails, comments and lot of you asked for a low carb sugar free chocolate chip cookies. Last week I shared my shortbread Halloween sugar free cookie recipe sweetened with pumpkin puree. Pumpkin is a great natural sweetener, while it is still high in carbs for some of you. That is why I am coming back with a 100% sugar free cookies recipe!
If you love crispy borders, moist nutty center and melted sugar free chocolate chips, make those now ! You won’t regret it.

I am using Healtheries sugar free chocolate chips in New Zealand. You can find both – dark chocolate or milk chocolate. If you can’t find sugar free chocolate chips at the store, make your own following my chocolate chip recipe. Last option, replace the sugar free chocolate chips by roasted cocoa nibs. It won’t melt but it doesn’t contain sugar and it has a strong cocoa flavor.

Another great thing about those Sugar free Chocolate Chip Cookies: they don’t use flour. They are made of low carb ingredients that create the most delicious crunchy cookies: coconut, coconut flour and cashew nuts. Coconut flour is essential in this recipe. It brings all the ingredients together to create a crunchy cookie. I recommend to use cashew pieces in this recipe – cheaper than cashews.

Sugar free Chocolate Chip Cookies

Prep Time :10 mins
Cook Time :20 mins
Total Time :30 mins

Delicious sugar free chocolate chip cookies recipe. One bowl easy low carb cookie recipe with coconut flour, cashews and stevia. Healthy gluten free chocolate chip cookies for diabetic.
Course: Dessert
Cuisine: American
Servings: 8 cookies
Calories: 245 kcal

Ingredients
  •     2 cup unsweetened dessiccated coconut (180g)
  •     2 tablespoon coconut flour
  •     3/4 cup cashews nuts (100g) unroasted or roasted
  •     ¼ cup extra virgin coconut oil , melted
  •     2 egg
  •     1/4 cup sugar free chocolate chips
  •     1/4 cup swerve
  •     1 tablespoon vanilla extract

Read More : Sugar free chocolate chip cookies

The BEST Chicken Parmesan


The BEST Chicken Parmesan. A quick and easy 30 minute weeknight meal everyone will love!

Now I know that’s saying a lot but this Chicken Parmesan is pretty darn amazing. Juicy, tender chicken breaded in a mixture of parmesan cheese and panko breadcrumbs. Pan fried until golden brown and topped with melted mozzarella cheese and marinara.

This Chicken Parmesan is one of my all time favorite meals
This Chicken Parmesan is super easy to make. It takes less than 30 minutes to make start to finish.

This recipe starts with a 3 step breading process. Flour, egg and parmesan breadcrumbs. I use skinless boneless chicken breast and cut them in half. I pound them out to a 1/2 inch thickness. This keeps the chicken juicy and tender.

The best way to bread the chicken is to keep one hand for wet ingredients and one hand for dry. This helps from getting the dreaded breading hands.

Why this Chicken Parmesan is so awesome:

  •     Replacing some of the breadcrumb with parmesan cheese helps to keep the breading crispy on the outside.
  •     Pounding the chicken to a 1/2 inch thick keeps the cooking time down and the chicken juicy and moist.
Serve with a big plate of pasta and extra tomato sauce on the side. Enjoy!

The Best Chicken Parmesan
Prep time: 20 mins
Cook time: 10 mins
Total time: 30 mins
Serves: 4

Ingredients
  •     2 boneless skinless chicken breasts (1 pound)
  •     ¼ cup all purpose flour
  •     1 egg
  •     ¾ cup panko breadcrumbs
  •     ½ cup parmesan cheese, grated
  •     2 tablespoons extra virgin olive oil
  •     1 cup tomato sauce
  •     ½ cup mozzarella cheese, shredded
  •     basil for serving, if desired

Read More : The BEST Chicken Parmesan

Nutella Fudge Brownies


These Nutella Fudge Brownies are decadent little bars! With a dense brownie on the bottom, Nutella fudge in the middle and chocolate on top, you can’t go wrong.

Do you ever have those days where you have all these things on your list to get done and you really think you’ll actually have time to accomplish them? Like, really. You’re sure it’ll all get done.

Then the end of the day comes along and you didn’t even get to half of it?

Then you’re like, well I need to feel better about all I accomplished so let’s add the things that I did that aren’t on the list so that I can cross them off too and feel more accomplished.

The story of my life.

So many things. ALL the things! So little time.

Fortunately, at the end of a long day of accomplishing many things (thought not ALL the things) there are bars like these to reward you for your hard work and a job well done. And really, is there any better reward than Nutella and chocolate? Fudge and brownie? I didn’t think so.

The brownie is a modified version of this very popular brownie recipe on my site. They are so loved for two reasons – they are tasty and they are super easy to make. Of course not one to make things simple for myself, I decided to modify the brownie. The other one calls for oil and I decided to try it with butter. I also made a few other changes to make this brownie more fudgy and a little less cakey. The final brownie is perfectly dense and fudgy, without being too dense. Love.

The brownie is topped with fudge. Nutella fudge. I love all things Nutella. It always amazes me when Nutella actually makes it into a recipe and doesn’t just land straight in my mouth on a big fat spoon.

Please say you understand.

The fudge is easy to make by combining sweetened condensed milk, butter, chocolate and Nutella. Everything is melted and combined on the stove before being spread over the brownie.

I topped the bars with a little bit of chocolate. It’s note entirely necessary but I think it finishes it off well. There’s a touch of shortening mixed into the chocolate so that it’s not super hard to bite into on the bars. You could switch out the shortening for a tablespoon or two of heavy cream, if you prefer.

These bars are little bites of heaven and they are quite simple to make. They are fairly rich, so they go a long way. I tend to be someone who cuts big pieces, but you really don’t need big pieces of these bars. Fudge can have that effect. Fortunately for us that means the bars last longer! YAY!!

Nutella Fudge Brownies


Yield: 12-16 brownies

Ingredients:


Brownies:

  • 3/4 cup unsalted butter, melted (I use Challenge Butter)
  • 1 cup sugar
  • 1 tsp vanilla extract
  • 2 eggs
  • 3/4 cup flour
  • 6 tbsp cocoa
  • 1/4 tsp baking powder
  • 1/4 tsp salt
Fudge :
  • 14 ounce can sweetened condensed milk
  • 2 tablespoons unsalted butter, room temperature
  • 1 1/2 cups chocolate chips
  • 1 cup chocolate-hazelnut spread, such as Nutella
Topping:
  • 6 oz chocolate chips
  • 1 tbsp shortening

Read More : Nutella Fudge Brownies

Melt in Your Mouth Sweet Cream Pancakes


Amazing Melt in Your Mouth Sweet Cream Pancakes is the best pancake recipe around and will be the only pancake recipe you’ll ever need! Sweet and dreamy!

I love pancakes and I think they are probably the BEST breakfast food ever created. Don’t get me wrong, I love a good omelette and a crispy piece of bacon, but eating a pancake for breakfast is like going to a party at your breakfast table. You really can dress them up however you want, topped with fruit or drizzled with chocolate syrup. Yum.

Recently, my family and I ate dinner at a local restaurant that happened to serve breakfast all day.  I looked at their breakfast menu and found Sweet Cream Pancakes, so of course, that’s what I ordered. Let me tell you, they were amazing! The pancakes were so sweet and dreamy they probably didn’t even need syrup. You know I still used syrup though, right?

The poor, sad members of my family who didn’t order the Sweet Cream Pancakes, were desperately asking for bite after bite of my delicious meal so I knew that I needed to recreate this deliciousness at home for breakfast the next morning.

I ended up adapting my buttermilk pancake recipe by replacing the buttermilk with heavy whipping cream. I also added a little more sugar to make the pancakes a little sweeter. BAM! We had a winner!

I don’t know about you, but I happen to like my pancakes the “classic” way, topped with butter and maple syrup. But it’s also fun sometimes to mix things up and add different toppings. Below I have also included the recipes for a few toppings. The same pancake batter but made four different ways. Not only can you enjoy these amazing Melt in Your Mouth Sweet Cream Pancakes the classic way, you can also make them Birthday Cake style (my kids favorite), covered with chocolate chips and peanut butter syrup or layered with a cheesecake topping and chopped strawberries! You’re welcome.

Melt in Your Mouth Sweet Cream Pancakes

Amazing Melt in Your Mouth Sweet Cream Pancakes is the best pancake recipe around and will be the only pancake recipe you'll ever need! Sweet and dreamy!
Course     Breakfast
Prep Time : 5 Minutes
Cook Time: 5 Minutes
Servings : 6 People

Ingredients


Sweet Cream Pancakes
  •     2 cups flour
  •     2 tsp baking powder
  •     1 tsp Baking Soda
  •     1/2 tsp Salt
  •     1/3 cup Sugar
  •     2 eggs
  •     2 tsp Vanilla Extract
  •     3 cups heavy cream
Birthday Cake Pancakes
  •     1 recipe Sweet Cream Pancakes (above)
  •     Rainbow Sprinkles
  •     Vanilla Ice Cream or Whipped Cream
  •     Maple Syrup
Strawberry Cheesecake Pancakes
  •     1 recipe Sweet Cream Pancakes (above)
  •     4 ounces cream cheese softened
  •     1 cup heavy cream
  •     1 tsp Vanilla Extract
  •     1 cup powdered sugar
  •     Strawberries chopped
  •     Graham Cracker Crumbs
  •     Maple Syrup
Peanut Butter Chocolate Chip
  •     1 recipe Sweet Cream Pancakes (above)
  •     1/2 cup Maple Syrup
  •     1/4 cup Creamy Peanut Butter
  •     Chocolate Chips
Read More : Melt in Your Mouth Sweet Cream Pancakes

Easy Tiramisu Recipe


Easy Tiramisu Recipe – easy 5-minutes, no-bake tiramisu recipe without eggs.
Easy Tiramisu is favorite Italian trifle made of ladyfingers soaked in coffee, layered with a mixture of whipped cream and Mascarpone cheese. You need only 5 minutes to make it. So quick, so easy!
I always make Tiramisu without eggs because I don’t like recipes using raw eggs in desserts. The addition of whipped cream makes this delicious treat even lighter.
When you’re in the mood for something rich and delicious, this simple no bake Tiramisu cake is just for you.

Easy Tiramisu Recipe


Servings: 4 -6

Ingredients


  •     1 cup whipping cream
  •     1 cup Mascarpone cheese
  •     2-3 Tbs sugar to taste
  •     1 tsp vanilla extract
  •     1 Tbs amaretto or rum
  •     2 1/2 cups strong cold coffee
  •     200 g (about 7 oz) ladyfingers (savoiardi)
  •     cocoa for dusting

Read More : Easy Tiramisu Recipe

Cheesy Garlic Herb Crack Bread


Cheesy Garlic Herb Crack Bread is outrageously buttery and cheesy with each pull-apart piece and bursting with fresh herb and garlic flavors. The BEST!

Tessa's Recipe Rundown...

Taste: Is there any combination more comforting than cheese, garlic, and herb? You could even dip this bread in marinara sauce to amp things up even more.
Texture: I mean, c’mon. Heaven is this crusty, buttery, cheesy goodness.
Ease: Easy, just a tiny bit tedious getting the butter and cheese into all the cracks in the bread. Use a sharp serrated bread knife to make easy work of forming the pull-apart pieces.
Appearance: Positively mouthwatering.
Pros: Simple, crowd-pleasing, can be made ahead of time, and SO GOOD.
Cons: This bread is so good but oh so bad.
Would I make this again? Absolutely.

I’ve even shared a scrumptious recipe for Garlic, Herb, and Cheese Rolls which is comprised of the same basic ingredients as this recipe, just while making homemade bread instead of using an already baked loaf. Of the many bread recipes I’ve shared over the years, this one may be the most over-the-top and addictive, hence the word crack in the title.

It’s also one of the only ones that calls for a pre-made loaf and that’s because I’ve found this recipe tastes best with sourdough bread, which is more of a challenge to make from home. I’ve been thinking of doing a series on sourdough so if that’s something you’d like to see let me know in the comments below!

Either way, I just had to share my little version of the recipe with you which was inspired by Recipe Tin Eats. It’s everything you could want in a carb loaded bite: cheesy, buttery, garlicky, herby, and crusty yet soft. We just about died over this bread and could NOT get enough. Jared said it was one of his favorite things he’s ever eaten, so you know it’s damn good.


Cheesy Garlic Herb Crack Bread

Yield: 8 servings
Prep Time: 10 minutes
Cook: 30 minutes

Ingredients
  • 1 crusty sourdough or artisan loaf
  • 4 ounces (1 stick) unsalted butter, melted
  • 2 garlic cloves, minced
  • 1/2 teaspoon kosher salt
  • 1 tablespoon fresh parsley, chopped
  • 2 teaspoons fresh rosemary, minced
  • 2 teaspoons fresh thyme, minced
  • 3/4 cup shredded Mozzarella cheese

Read More :  Cheesy Garlic Herb Crack Bread

Golden Turmeric Milk Recipe


Golden Turmeric Milk is an age-old home remedy for an impressive list of ailments like cold and flu symptoms, joint pain, ulcerative colitis, and indigestion. Turmeric (Curcuma longa) possesses circulation-boosting properties and is both a natural anti-oxidant and anti-inflammatory.

A friend said a nightly cup had greatly helped with her carpal tunnel syndrome. Turns out, it’s also helped people with arthritis like mine. Although I’m grateful for modern medicine and a supportive rheumatologist, my pain meds make me nauseous, so I avoid taking them for all but the worst flares.

I figured I’d give this Golden Turmeric Milk thing a try even though it didn’t sound very appealing to me. I think turmeric has an almost chalky yet peppery taste. While that makes it fantastic in curries and Chicken Tikka Masala, it didn’t sound like something that would go well with milk.

The first turmeric milk I tried confirmed my fears — it tasted vile — but I forced myself to drink it for five straight nights. Sure enough, I noticed less joint pain and swelling. I slept better, too.

That convinced me that I needed to make turmeric part of my daily regimen, either as a pill or by coming up with turmeric milk recipe that I’d enjoy. Or both!

This recipe is the result, and the combination of turmeric’s properties and warm milk make it a fantastic pre-bedtime drink. Having added some other spices, plus honey and vanilla, it tastes more like chai than the first unpleasant turmeric milk I’d tried.

I enjoy it so much that I sometimes have two cups and tell myself that the extra calcium and Vitamin D in the milk justify the calories.
 
Golden Turmeric Milk


Prep time:  2 mins
Cook time:  5 mins
Total time:  7 mins
Turmeric milk is an ancient treatment for coughs, headaches, joint pain and skin problems thanks to the spice's anti-inflammatory and anti-oxidant properties. Combined with cinnamon, ginger and other spices, it becomes a soothing and delicious drink that's good for you, too!

Ingredients :

  •     1 teaspoon ground turmeric
  •     1 teaspoon ground cinnamon
  •     ¼ teaspoon ground black pepper
  •     ¼ teaspoon ground ginger
  •     ¼ teaspoon ground cloves
  •     ¼ teaspoon ground allspice
  •     Milk
  •     Honey
  •     Vanilla extract (optional)
 Read More : Golden Turmeric Milk Recipe

Super Soft Homemade Donuts


I’m excited to share this recipe with you today. We’ve tried many many different donut recipes, some that are suppose to be quick, no-rise donuts, and others that you work with all day and let them rise, etc. Some were good, others were okay, but it wasn’t until we made these and devoured the entire batch in a few hours marveling the entire time about how soft, and good they were, that we knew we’d found an amazing donut recipe. It comes from the350degreeoven.com, and tastes just like Krispy Kreme Donuts.

One of the things that I love about this recipe is that you can just toss all the ingredients in a bread machine and let it do most of the work! If you don’t have a bread machine, don’t fret, you can make these without a machine as well. :)

This picture below is what the Tangzhong will look like after you mix the flour and water and heat it over medium heat on the stove. This is a dough enhancer, and works great in this recipe. It only takes a few minutes and is done when you start to see swirl lines. (See more instructions in the recipe).

Super Soft Homemade Donuts

Yields 24
A super soft homemade glazed donut.
Prep Time: 15 min
   
Ingredients :
  •     2 1/2 cups all-purpose flour
  •     4 Tbsp sugar
  •     3 Tbsp butter, softened
  •     1/2 tsp salt
  •     1/2 cup milk or kefir
  •     1 egg
  •     2 tsp Active Dry Yeast
  •     1/2 cup tangzhong (see just below-don't worry, it's super easy)
  •     Oil for frying
Tangzhong (also see picture above)
  •     1/3 cup all-purpose flour
  •     1 cup water
Glaze
  •     3 cups powdered sugar
  •     1/2 cup water or milk (I like to use water) (You can use less water if you want the glaze thicker- maybe start with 1/3 cup instead)
  •     4 tsp vanilla

Read More : Super Soft Homemade Donuts

Baked Garlic Parmesan Potato Wedges


Baked Garlic Parmesan Potato Wedges-these easy baked potato wedges are our favorite fries! They are crispy, cheesy, garlicky, salty, and perfect for dipping in ketchup or your favorite sauces!

I usually crave sweets more than salty foods, but put a plate of hot French fries in front of me and I will have a hard time resisting one or two…or a big handful.

Our boys looooooove French fries. Put a plate of fries in front of them and they won’t make a peep. They will devour them and have ketchup all over their cute little faces.

Our favorite fries are these Baked Garlic Parmesan Potato Wedges. They are baked in the oven, not fried, but you will never know it because they are SO good!

Baked Garlic Parmesan Potato Wedges Recipe


I love these fries because they are baked, but still crispy! The secret? We soak the wedges in ice water for 30 minutes before putting them into the oven. I know it sounds kind of crazy to put the potato wedges in water to make them more crispy, you think it would make them soggy, but nope! Soaking them in water removes excess potato starch and makes them extra crispy!

When the potato wedges are done soaking, we toss them with olive oil, garlic, rosemary, and grated Parmesan cheese. Season with salt and pepper and bake until crispy!

When the potato wedges come out of the oven, I dress them up with a little freshly chopped parsley. Serve warm and dip in your favorite sauces!

Our boys love ketchup and fry sauce. If you don’t live in Utah, you are probably wondering what in the world is fry sauce? It is a mixture of ketchup and mayo! I don’t get the obsession, but most Utahns love it, including our boys:)

Serve these crispy Baked Garlic Parmesan Potato Wedges as an appetizer or along side any meal! They are our favorite fries and I think you will love them too!

These easy baked fries are our favorite! You will never know they are baked because they are so crispy and delicious!

Yield: Serves 8
Prep Time: 30 minutes
Cook Time: 35 minutes
Total Time: 1 hour 5 minutes
Ingredients:
  •     8 small russet potatoes, cut into wedges
  •     1/4 cup olive oil
  •     4 cloves garlic, minced
  •     1/4 teaspoon dried rosemary
  •     1/2 cup grated parmesan cheese
  •     Salt and black pepper, to taste
  •     2 tablespoons chopped parsley, for garnish
  •     Ketchup or other sauces, for serving, optional

Read More : Baked Garlic Parmesan Potato Wedges

One Dish Chicken Bake Recipe


his is a sponsored post written by me on behalf of Hunt’s® tomatoes. All opinions are 100% my own.
One Dish Chicken Bake – Flavorful chicken baked on a bed of tomatoes and covered in cheese makes for a one-dish dinner the whole family will enjoy.

The best one-dish chicken bake you will ever need! Buhlieve me. You have your veggies, your protein, AND cheeeese!

Hey Yo! How are you on this fine Monday-day? Are you Mondaying?! You know… sleepy, coffee carafe in hand, wondering why weekends go by so fast?

I’m totally Mondaying. I’m SO. tired. I had a full house last night, celebrating with friends and family, and now I’m all like, wow. can we do that again?! And not get up when the alarm clock tells me that I should? That’d be nice.

Buuuut on to more important things: Food.

I desperately love a good chicken recipe. I think you know this to be true.

What I REALLY love is a good one pot chicken, that is also beautiful, delicious, and hardly any work is involved. Bonus points if tomatoes and cheese are present, and if said dish is perfect for a Holiday meal. It’s the ultimate dinner.

I’m tempted to tell you that the best part here in this One Dish Chicken Bake Recipe is the bed of tomatoes, all warm and bubbly, but really, the best part is the duo of tomatoes and tender chicken. The entire thing covered with cheese? It kicks it up and just adds a ton of flavor.

For the tomatoes, I used Hunt’s ORIGINAL Diced Tomatoes because, a) I love the size of the already chopped up, perfectly sized tomatoes, and b) their tomatoes come from California farms (USA!), AND they contain 100% natural tomatoes. They’re made with vine-ripened tomatoes, which is a non-GMO food, and they have no artificial ingredients and no preservatives added. WIN WIN! To add, Hunt’s cans their diced, whole, stewed and crushed tomatoes within hours after harvest.

The beauty behind this flavorful meal is that prep time is only a few minutes. Layer all the ingredients in your prettiest baking dish and let your oven do its thang.

One more thing? This would look absolutely perfect on your Holiday menu!

ENJOY!

One Dish Chicken Bake Recipe

Flavorful chicken baked on a bed of tomatoes and covered in cheese makes for a one-dish dinner the whole family will enjoy.
Course Dinner
Prep Time : 5 minutes
Cook Time : 35 minutes
Total Time :40 minutes
Servings 4
Calories 342.7 kcal

Ingredients
  •     1 can (14.5 ounces) Hunt's Original Diced Tomatoes Hunt's Original Diced Tomatoes, drained
  •     1 tablespoon extra virgin olive oil
  •     1 yellow onion , chopped
  •     3 cloves garlic , minced
  •     1 teaspoon dried oregano
  •     1 teaspoon Italian seasoning
  •     2 tablespoons chopped fresh parsley
  •     4 boneless, skinless chicken breasts
  •     salt and fresh ground pepper , to taste
  •     3/4 cup grated gruyere cheese
  •     chopped fresh parsley , for garnish

Read More :  One Dish Chicken Bake Recipe

Apple Pecan Cake with Caramel Glaze


This apple pecan cake will get you in the mood for fall. The glaze on this cake oozes with caramel goodness. The scrumptious apple flavor, with delicious pecans mixed throughout, will definitely satisfy your taste buds!

There are lots of apple pieces and pecans throughout this cake. The moist texture and the flavor will have you baking this cake over and over for many years to come

Fall is definitely one of my favorite seasons, not only for the fresh crisp air and the beautiful changing leaves, but for the delicious baked goodies that are baked with love for my family and friends. The smells that surround my kitchen, practically on a daily basis during this time of year, is one that I truly enjoy and one that definitely gets me in the mood for fall.

Give this delicious recipe a try the next time you are craving something sweet!

Apple Pecan Cake with Caramel Glaze


This Apple Pecan Cake is so delicious! Just one bite of this cake will have you baking it over and over again!

Prep time : 30 mins
Cook time : 1 hour
Total time : 1 hour 30 mins
 Recipe type: Cake, Dessert
Serves: 8-10

Ingredients

  •     1½ cups of cooking oil
  •     2 cups sugar
  •     4 Eggs
  •     3 cups of flour
  •     1 tsp baking soda
  •     ½ tsp cinnamon
  •     1 tsp salt
  •     2 tsps vanilla
  •     3½ cups Granny Smith apples (approximately 3-4 apples), peeled and chopped
  •     1 cup of chopped pecans
Caramel Glaze
  •     ¾ cups butter (1½ sticks)
  •     1 cup light brown sugar
  •     ¼ cup milk
  •     1 tsp vanilla

Read More : Apple Pecan Cake with Caramel Glaze

Peanut Butter Chia Overnight Oats


The concept of overnight oats can be somewhat confusing to newbies, which is totally understandable.
  •  But, how does it work exactly?
  •  How are they “cooked” in the fridge, overnight?
  •  Do I eat them cold?
  •  Can I eat them warm (because eating cold oats weirds me out)??
  •  Why are they made in a jar?
WHAT’S GOING ON HERE.

I get you. At one point, I also pondered those hard-hitting questions. So lemme explain.

When it comes to overnight oats, there’s no right way or wrong way to make them or eat them. It’s kind of up to you and what you prefer.

Overnight oats are basically rolled oats swirled together in a mason jar with any kind of dairy-free milk, plus any extra goodness you feel like adding (chia seeds, berries, nuts, cinnamon, cacao powder, nut butter etc.). Then you seal the mason jar (or covered bowl, if that’s all you have) in the fridge overnight. The oats soften and soak up the liquid, essentially “cooking” overnight, so there’s no need to actually cook them.

Voila! YOU HAVE MAGIC IN A JAR.

Why do busy people love overnight oats so much? They’re CONVENIENT and CUSTOMIZABLE.

We’re busy. Life is crazy town sometimes. There are days when we wake up late and breakfast turns into a quick larabar so we aren’t late to work (which will leave us starvedddd in an hour or two, because a larabar is a snack y’all). We’ll be wishing for some magic-in-a-jar.

Overnight oats are a healthy grab-n-go breakfast, meaning one less thing you have to worry about, come morning. You literally grab the jar out of the fridge (don’t forget a spoon) and BOOM. The creamiest, yummiest breakfast that saves time, tastes uh-mazing, keeps you full and energized and more importantly, keeps you nourished. There’s literally nothing better. While I love smoothies, my love is equal for overnight oats.

You could warm them up on the stove in the morning, or dare I say it, in the microwave, OR you can eat them room-temperature, as I usually do. I take the jar out of the fridge and set it on the counter to warm up while I make coffee and chug my lemon water and love on Taz until he’s annoyed with me. That way, the oats aren’t “cold” but I also don’t have to dirty any more dishes. Hashtag lazy.
Why do I love overnight oats? Brain fuel. Packed with oodles of nourishment. DELISH. Filling. Easyyyy.

You should totally make them in cute mason jars, especially if you’re on the go because of the screw-on lid! Spillage problems avoided, you are welcome.

I poured my overnight oats into a bowl (as shown in some pictures) but either way, you can get creative, customize with your fave add-ins and be excited for your breakfast in the morning. Let’s talk about add-ins and toppings. The options are endless here. This is the part where you transform overnights oats into whatever you want them to be.

Overnight Oat Flavor Ideas:

  •     Peanut Butter Brownie? Add in peanut butter and cacao powder.
  •     Banana Coconut? Add in coconut milk, mashed banana and coconut flakes.
  •     Protein-Powered Berry Bliss? Add in plant based protein powder and berries (fresh or frozen).
  •     Crunchy and Savory? Add in crushed walnuts, cacao nibs and nut butter.
  •     Superfood Packed? Add in chia seeds, hemp seeds, maca powder, gogi berries etc.
  •     Peanut Butter and Jelly? Add peanut butter and jelly. Yup.

These heavenly Peanut Butter Chia Overnight Oats are loaded with so much goodness, lemme tell you. Whole grain oats, unsweetened vanilla almond milk, mashed banana (for natural sweetness) “peanut butter” which I will talk about, chia seeds, cinnamon, a teeny pinch of sea salt, coconut flakes, crushed almonds and cacao nibs. Sweet, savory, crunchy, creamy, energizing and superfood infused. Just the way I like it.
Fun fact! Two tablespoons of chia seeds contains: eight grams of fiber, six grams of plant protein, 12% of the daily value of iron, and 16% of the daily value of calcium.

I always, always, always add chia seeds to my overnight oats. They are little superfood gems! Just be sure to add extra liquid as chia seeds and oats SOAK up every ounce. The more liquid, the creamier and better.

For the “peanut butter”, I used a lightened up version. PB Fit Powder is a de-fatted peanut butter powder you mix with water to create the dreamiest peanut butter, with a little less fat. I’m obsessed!!


Peanut Butter Chia Overnight Oats


Ingredients

  •     3/4 cup rolled oats
  •     2 tablespoons chia seeds
  •     1/2 teaspoon cinnamon
  •     pinch of sea salt
  •     1 cup unsweetened vanilla almond milk (or any plant milk)*
  •     1/2 cup filtered water
  •     1 teaspoon vanilla extract (optional)
  •     1 ripe banana, mashed (but leave a few banana coins for topping!)
  •     2 tablespoons PB Fit powder + 1 1/2 tablespoons water (or any nut butter, to taste)
  •     1-2 tablespoons maple syrup or agave, for extra sweetness
Extras/Toppings
  •     cacao nibs (optional)
  •     coconut flakes
  •     crushed almonds
  •     sliced banana coins
  •     extra sprinkles of cinnamon!


Read More : Peanut Butter Chia Overnight Oats

Italian Stuffed Shells


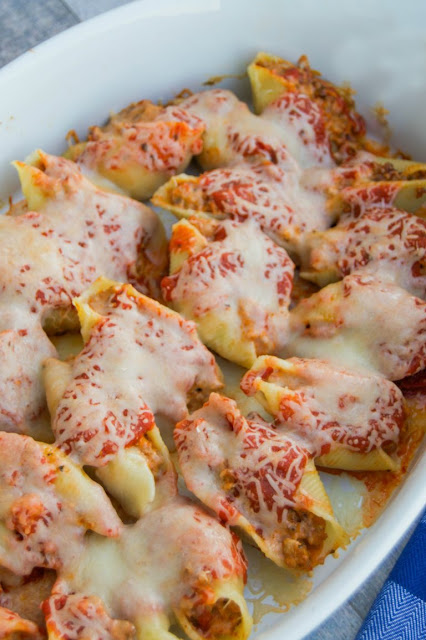
These Italian Stuffed Shells are the best! My all time favorite stuffed shells Creamy, cheesy, delicious!

Any pasta dish is so simple to put together and cheap to make. I stuffed these Italian Stuffed Shells with seasoned meat, cream cheese, and marinara sauce. I topped it with more marinara and shredded cheese and baked! It so simple to make and my entire family loved it!

I cooked 1/2 a pound of ground sausage with a 1/2 of pound of ground beef. Season it with Italian seasoning then add in cream cheese! Melt it in then mix in your marinara sauce. Stuff your shells and place them in a casserole dish. Top with more marinara sauce and shredded cheese. Bake and then dinner is ready! Simple and easy!

Italian Stuffed Shells

Prep Time: 15 minutes
Cook Time: 15 minutes
Total Time: 30 minutes
Ingredients
  •     Jumbo shells, 1/2 box (This will depend on how full you stuff them)
  •     Ground sausage, 1/2 lb
  •     Ground beef, 1/2 lb
  •     Cream cheese, 4 oz
  •     Italian seasoning, 1 tsp
  •     Garlic powder, 1 tsp
  •     Marinara sauce, 1 1/2 cup (divided)
  •     Mozzarella cheese, shredded, 1/2 cup


Read More : Italian Stuffed Shells

Honey Garlic Chicken Stir Fry


This honey garlic chicken stir fry recipe is full of chicken and veggies, all coated in the easiest sweet and savory sauce. A healthier dinner option that the whole family will love!

So it seems like stir fries have kind of become my thing. It wasn’t something I set out to do, but my stir fry recipes tend to be some of the most popular recipes on my site! Today I’ve got a honey garlic chicken version that’s quick, healthy and incredibly easy to make! I love that you can customize the meat and veggies exactly to your liking, and the honey garlic chicken sauce only has 4 ingredients, how can you go wrong with that?

This honey garlic chicken stir fry recipe is full of chicken and veggies, all coated in the easiest sweet and savory sauce. A healthier dinner option that the whole family will love!
Save

Let’s first talk about how to make honey garlic chicken. Cook the vegetables in a hot pan, then remove the vegetables and add diced chicken breast and minced garlic. When the chicken is cooked through, add the vegetables back into the pan. Whisk together chicken broth, soy sauce, honey and corn starch, then pour over the chicken and vegetables. Simmer for a few minutes then enjoy!

This honey garlic chicken stir fry recipe is full of chicken and veggies, all coated in the easiest sweet and savory sauce. A healthier dinner option that the whole family will love!
Save

You can use whatever vegetables you like here, I typically go with carrots and broccoli because that’s what my family prefers. Other great options are mushrooms, bell peppers, onions, snow peas, green beans or even asparagus. This recipe is written for garlic lovers with 4 cloves of garlic in the dish. If you prefer you can cut that amount down to 2-3 cloves and it’ll still be delicious. Serve your honey garlic chicken over rice for a quick meal that’s sure to please the whole family.

This honey garlic chicken stir fry recipe is full of chicken and veggies, all coated in the easiest sweet and savory sauce. A healthier dinner option that the whole family will love!
Save

Still hungry? Follow Dinner at the Zoo on Facebook, Twitter, Instagram and Pinterest for more great recipe ideas!

This honey garlic chicken stir fry recipe is full of chicken and veggies, all coated in the easiest sweet and savory sauce. A healthier dinner option that the whole family will love!

Honey Garlic Chicken Stir Fry

This honey garlic chicken stir fry recipe is chicken and vegetables, cooked to perfection and tossed in a sweet and savory sauce.

Prep Time 10 minutes
Cook Time 20 minutes
Total Time 30 minutes
Servings 4
Calories 263 kcal

Ingredients
  •     1 tablespoon + 1 teaspoon vegetable oil divided use
  •     1 cup thinly sliced peeled carrots
  •     2 cups broccoli florets
  •     1 lb boneless skinless chicken breasts, cut into 1 inch pieces
  •     4 cloves garlic minced
  •     1/4 cup low sodium chicken broth or water
  •     1/4 cup soy sauce
  •     3 tablespoons honey
  •     2 teaspoons cornstarch
  •     salt and pepper to taste

Read More :  Honey Garlic Chicken Stir Fry

No-Bake Cannoli Cream Pie


Looking for a easy and delicious dessert that doesn’t take long to make? Then you’ll want to try this luscious No-Bake Cannoli Cream Pie filled with cream cheese, ricotta cheese and mini chocolate chips.

Valentine’s Day is just around the corner and love is in the air! Sure it’s fun to go out to eat but I actually have more fun celebrating it at home with my husband and kids. Unlike usual weeknight dinners at home for Valentine’s Day I like to create a mood and make it festive and fun. The kids love it! Instead of eating in the kitchen I’ll make it special and we’ll eat in the dining room. I’ll set the mood and decorate it pretty with lots candles, hearts and rose petals. It’s so much fun and sure beats going out dealing with crowded restaurants!

What’s Valentine’s Day without dessert, right? It’s my favorite part of the meal! Chocolate covered strawberries, red velvet, candy, you name it! I’ll have it all! Valentine’s Day just wouldn’t be Valentine’s Day without a few sweet treats so I have a few of my favorite Valentine’s Day desserts that I’ll be featuring the next few days that are not only delicious but ridiculously easy to make!

I’m such a fan of no-bake pies. They’re super easy to make and perfect for any occasion. Plus they’re always a hit so why not! This No-Bake Cannoli Cream Pie is one of my absolute favorites and I think a great dessert for Valentine’s Day or just about any day for! I have a weakness for a good cannoli! I love them! The best part of the cannoli is of course the rich and creamy filling! Give me a bowl of that and a spoon and I’m a happy mama! I took all that goodness from that irresistible filling and created this easy No-Bake Cannoli Cream Pie. I use a store bought pie crust but you could totally make your own with graham cracker crumbs, butter and sugar if you prefer. I even included that recipe for that too. Whether you make your own crust or use a store bought one this dessert will take you minutes, that’s right just a few minutes to whip up! Easy peasy my friends! It can’t get any simpler and the end result is total creamy cannoli cream pie perfection!

If you’re Valentine is a cannoli lover then you need to make this No-Bake Cannoli Cream Pie deliciousness! Dig in my friends! It doesn’t get better than this!

More no-bake favorites!

No-Bake Peanut Butter Pie
No-Bake Pineapple Pie
No-Bake Pumpkin Cheesecake
Low Carb Lemon Cheesecake

No-Bake Cannoli Cream Pie


Prep time : 10 mins
Total time : 10 mins
Serves: 8

Ingredients

  •     1 (8 ounce) pacakge cream cheese, softened
  •     1 teaspoon pure vanilla extract
  •     1½ cups heavy cream
  •     1 cup whole milk ricotta
  •     ¾ cup confectioners sugar
  •     Dash of ground cinnamon
  •     ½ teaspoon orange zest, optional
  •     ¾ cup mini chocolate chips
  •     1 9-inch store bought graham cracker crust
Topping
  •     ½ cup heavy cream
  •     2 tablespoons confectioners sugar

Read More : No-Bake Cannoli Cream Pie

Caramel Crunch Bars


These Caramel Crunch Bars, with layer upon layer of delicious sweet, salty, caramel goodness, are one of my favorite easy no-bake desserts!

No Bake Treats are everything during these hot summer months–am I right?! I could eat these scotcheroos, or this almond coconut chex mix, or these pretzel peanut clusters all summer looooong. Don’t make me pick a favorite.

If you were to make a mash-up of my graham cracker toffee bars, and my scotcheroos, you would get these Caramel Crunch Bars. They start with a layer of plain ol’ Club crackers. Then you make a hot caramel filling and pour half of it over the crackers. Repeat with another layer of crackers, and the rest of the caramel filling. Top it all with a melted mixture of chocolate chips, butterscotch chips, and peanut butter. Refrigerate the bars to let everything set.

ust look at those layers of crunch, caramel and chocolate. Amazing!

I like to place a piece of parchment paper or tinfoil in the pan before making these. That way you can pull the bars completely out of the pan after they’ve been refrigerated, and they are way easier to cut. It also makes for really easy clean-up.

This recipe is adapted from an old Paula Deen recipe for homemade Kit Kat bars. While I agree that the texture is totally similar to a kit kat bar, the flavor is not. They definitely have a caramel taste to them. I also love that the chocolate topping is a combination of peanut butter, chocolate chips and butterscotch chips, just like in my beloved Scotcheroos recipe.

Caramel Crunch Bars

Course: Dessert

Ingredients:
  •     70-80 club crackers (about 2 full sleeves)
  •     1 cup butter
  •     2 cups graham cracker crumbs (about 1 1/2 full sleeves), crushed
  •     1 cup brown sugar , packed
  •     1/3 cup granulated sugar
  •     1/2 cup milk
  •     2/3 cup creamy peanut butter
  •     1/2 cup semisweet chocola


Read More :  Caramel Crunch Bars

Kategori

Kategori